Friday, January 28, 2011

Twirly, Whirly, and Gray

I needed a skirt for the Peanut to wear—her little sister had a dress and I needed something coordinating.  The Little Miss’s dress is grey wool, and I wanted something simple to go with it.

I picked up some gray suiting material with a nice drape (thank you, JoAnn), and used Carrie’s tutorial for the Easy, Peasy, Whrrly, Twirly Skirt.  It was just what I needed!

_DSC2518._DSC2517._DSC2574.

I didn’t do the bias tape on the bottom—I just made a simple hem.  It was great to use elastic (I had black) for a waistband and not have to use a casing.

Thursday, January 13, 2011

Peppermint Christmas Decor

Trying to get in the holiday spirit, I put up a few decorations for Christmas this year.  Last year my decorations were really sparse, as I had a two-month-old and little energy.  This year’s decorations were sparse also, as that two-month-old became a walking threat to any decorations.

So I was inspired by this, and made a decoration for my mantle.

_DSC1938

Hoping it might last until next year, I sprayed the finished product with several layers of polyurethane.

Fun and cute, no?_DSC1944

Wednesday, January 12, 2011

White Elephant Window Treatments

This might officially be the Best White Elephant Gift Ever: a roll of upholstery fabric.  And it isn’t even ugly; in fact, it is quite nice and fits in the color scheme of the main floor of my house.

_DSC1500.

The pattern has a nice sheen to it that didn’t pick up in the photographs, so you’ll just have to see it in person sometime.

Anyway, I took this:

_DSC1502.

And turned it into these:

_DSC2396

Cornices for the music room!

_DSC2393_DSC2398

(Ignore the fact that they’re a little wide—like the craft room, we’re going to put trim around the windows so I needed to leave clearance on the sides).

_DSC2403_DSC2404

Tuesday, January 11, 2011

Tiny Swimmer

I have now, officially, attempted the smallest sewing project I have ever done.  Barbie’s “little sister” (who is her daughter, to my daughter) wanted to go swimming in Barbie’s new pool.  And who can blame her, really?  It’s got a diving board and a basketball hoop…but I digress.  Anyway, she needed a suit.  I had a chunk of lycra sitting around, so I cut out a simple itty bitty suit for the little girl.  The hardest part was sewing the arm straps together—my machine just wanted to munch on the lycra rather than stitch it.

Here she is; styling and posing is courtesy of my daughter:

IMG_0162

And then her friend needed one too. IMG_0163

I was smart enough this time to cut it on a fold so I didn’t have to stich the arms, just the sides and bottom.

Glad that’s over!

Monday, January 10, 2011

Shelf Life

One of my friends found some cute decorative shelves that she liked but did not want to shell out big bucks for, so I made her a pair as a Christmas gift.  They are destined to have cute floral arrangements in the jars._DSC1676.

I didn’t have any directions, since I only had photos of the originals, but they’re simple enough I was able to figure out how to make them.  I took a trip to Menards and picked up a board and a little piece of trim.  I made my husband pick up some “L” brackets for me some random time he was out at a home improvement store, which is about every other day.

_DSC1677

I cut all of the wood by myself (on hubby’s beloved compound miter saw) and even cut the circle for the jar (thank you, dear drill press).  I sanded the edges using a disk sander (which I unfortunately just had to ask the name of, and described it to my husband as a “hand held sander-thingy”).  It is not painted—I was not sure what color my friend wanted and she likes painting, so she will get to paint it at her leisure.

_DSC1680

Sunday, January 9, 2011

Madam Librarian

My eldest daughter likes to look at books, but I don’t think to read them to her nearly as often as I wish I did.  I’ve been wanting a way to make books more accessible—well, they’re plenty accessible, as they’re on bookshelves within reach, but I wanted them to be more prominent so I would think to read to my children during the day.  I know.  I’m a bad mother.

One of my friends introduced me to the idea of rain gutter bookshelves.  They’re made of…wait for it…rain gutters.  The vinyl ones, of course—not aluminum.  They actually work out great—they’re lightweight, durable, and the mounting brackets can be purchased right off the rack and necessitate no modification.

So following this tutorial, I did a little update to our reading nook (read: hallway).

IMG_0192

We still have all of the room that the bookshelf gives us, but I now have a wall of “featured books” (or books that land there).  If I were fancy, I could make a point to put seasonally-appropriate books out when a holiday approached.  I’m not; I assume the books will naturally rotate themselves with some assistance from my fourteen-month-old and her book-flinging skills.

IMG_0195

And I am so pleased with the results!  Both kinds of results—I think they actually look great (and hubby, who kindly went along with the project but doubted that they would look nice, actually gave me/them a compliment!), and the girls have looked at many books today.  The Little Miss actually sat and let me read a book to her.  We put it back, then she went and got it back off the shelf and we read it again.  Twice.  I realized with some guilt that I read to her approximately never, and hope that it’s not too late to start—I hope that I haven’t failed her already!  Her sister could turn the pages of a book by seven or eight months; I realized today that the Little Miss is capable but hasn’t ever had the chance (some of that is because her older sister is always around, too).

Since the books are so bright and inviting, I haven’t had a problem (yet?) with the Little Miss grabbing the shelves and trying to use them as a ladder.  I’m not ruling out that she might, but I am optimistic.

IMG_0198

Saturday, January 8, 2011

To Market to Market

Inspired by Dana from made, I finally made a Market Skirt (well, two of them as I do things in pairs).  I didn’t do the pockets, as I thought they would be too much with my fabric (read: I was too lazy and was sure they wouldn’t turn our right), but everything else I did without much derivation.

Here’s the great tutorial: http://www.dana-made-it.com/2008/07/tutorial-market-skirt.html

_DSC2377.

I’m so excited for the girls to wear them—they have a pair of red shirts which, coincidentally, match quite well.  We might have to wait until early spring, as they’re a little springy, but the shirts are long-sleeved so we’re not limited by the weather.

And I’m really proud of my work this time—I actually zigzagged my seams (making me wonder about adding a serger to my wish list) and was really careful with my hem.

_DSC2381.

(The main fabric is Turqouise Blossoms from the Flora and Fauna collection by Patty Young.  The trim fabric is perhaps my favorite fabric ever because it is versatile and lovely.  I got it from JoAnn).

_DSC2387.

Here’s the pair.  Because the Little Miss is, in skirt world, essentially the same size as her older sister (since skirts are mostly based off of waist measurement, and the girls have about an inch difference, if that), I had to make some guesses as to how to shorten it so it didn’t take on peasant proportions.  If I were to make another, I’d probably shorten the main fabric by an inch and add an inch to the bottom trim.  This works anyway.

Sunday, January 2, 2011

One Day Barbie House

The peanut has been playing with Barbies quite a bit.  I contemplated buying an appropriately-sized dollhouse for her/them, but the houses are really really big and I was not sure if it was worth the investment.  When I was a kid, though, my mom fashioned Barbie houses for my sister and I out of some moving boxes, so I decided to get creative.

I had some leftover used banker boxes from when we moved, which are not really big enough, but work sufficiently.

I took some foam board scraps from my cornice project, and some random carpet foam my mom passed along to me._DSC1930.

And with the help of some generous amounts of duct tape (left over from a different project that didn’t work, but we won’t talk about that now), I made a new house for Barbie!

IMG_0110

I made enough furniture that the purpose of each room was evident, and I used scrapbook paper as wallpaper.  P.S. Mod Podge works great as wallpaper glue, if you’re a Barbie.

I sewed some basic sheets and pillows and crafted beds out of a combination of foam board and wood scraps from Hubby’s basement project.  Also: it’s amazing what a coat of acrylic paint will do to the aforementioned materials.  IMG_0131.The nice thing about sewing for dolls is the minimal amount of fabric needed.  I was able to make the beds for the little girls out of scraps from my “scrappy scraps” container—stuff that’s too small to do much else with.  I let the Peanut help pick out the materials for the sheets.IMG_0133.Here’s a bed.  The legs and headboard are made of 2x4 scraps (I didn’t cut any wood for this project; I was too lazy.  The pieces are all salvaged and used as-is) and the rest of the bed is insulating foam.  I made the mattress of carpet foam.IMG_0134.The girls in their beds.  Notice the fancy blankets—you’ve gotta love fleece, which doesn’t even need a hem!IMG_0137And Barbie likes to spend time in her living room on her fancy couch.  This fabric gives you a sneak peek of another project that I’ve finished, but not yet blogged about.IMG_0143.Barbie watches PBS.IMG_0145.

The TV table is fancy and is made entirely of wood—and hot glue.  The television is all foam, glue, and paint.

The kitchen looks pretty homemade (and thanks to hubby for cutting a chain link in half for me so the refrigerator doors could have handles), but I think it will work.  Barbie spends most of her time playing with her daughters and asking them if they need to go to the restroom, and not too much time cooking.  The kitchen sink and oven/stove are two 2x4s glued together with a piece of mat board for the backsplash.  Everything is drawn on (I heart the silver Sharpie!) save the range knobs, which are sew-on buttons from my notions drawer.   The fridge is a 2x4.  There’s also a striped table, which you can see in the very last picture.  It was a lid to a container I had, and I painted dowel rods and attached them as legs.  I’ll probably have to make chairs at some point, but that hasn’t been an issue yet.

IMG_0153.I didn’t have to make anything for the bathroom—the Peanut already had a sink and toilet that came with one of her Barbies, so I threw in a plastic container to act as a bathtub and called it a day.

The finished house:

IMG_0154.

And that’s it.  I don’t think it turned out too bad for making it in one day.  The Peanut likes it—I showed it to her and she said,

“My Barbie house!  I love it!”

Craft Room Makeover

I did a little makeover of the ol’ craft room/office.  You’ll notice the before.  It looks excellent, no?  The ladder is the kitty condo my mom and I made for the cat.  she has since relocated into the laundry room, giving us more space, and she’s happy to have more privacy.  The desks are mine (left) and hubby’s (right)—he doesn’t do any crafting, but has his computer and office stuff.DSC_0082 (2)

Here’s the after:IMG_0085

My friend and I painted the walls green. (I’m usually a blue girl, but green felt like it would inspire creativity.  We’ll see.)  I moved the cat out and rearranged the furniture (besides the desks).  I hung some matted and framed photography on the walls.  Surprisingly, for as much as I’m really interested in photography at the moment, I’m actually the less trained photographer in our house—hubby took photo classes in high school and college and had a dark room in his basement when growing up.  These are some of his pictures I dug out of binders in our closet.

Table in the corner, which is great for having extra space when I have friends over to craft.  Amazingly, I’ve actually had friends over to craft—a couple of friends and I made aprons for their children, and another friend and her mom came over for some hairbow making.

IMG_0087

But the thing I am most proud of are the cornices!IMG_0088

I ordered the fabric from fabric.com and it’s just what I wanted.  I made the cornices a bit wide, as we plan to put trim around the windows shortly.  I used these basic directions, and made a couple of slight changes.  I didn’t put tops on them so it was easier to wrap.  I’m actually pretty surprised at how good they ended up looking—hubby was worried about not making them out of wood.  The foam was so easy to work with, and they’re so light I don’t worry about them falling off of the wall and/or landing on my head.  I had my dear hubby rip the pieces apart on his table saw, then I did the other cutting with a utility knife.  I glued ‘em together with hot glue and had a great time with the staple gun attaching the fabric.  I hung them by attaching an eyelet screw inside each side and putting a nail in the wall.  So, yeah, I’ve got window treatments now.

…..

My parents were purging three great, tall bookcases, so I claimed them.  One holds books in the closet; one holds toys in the playroom, and the third holds my fabric stash and my kid’s board games.  It is organized but appears cluttered, so I made a curtain.  One of my friends had the brilliant idea to use a tension rod to hold it at the top, and it works amazingly!IMG_0072

This is not really related, but I got a thread organizer for Christmas and I’m quite fond of it:IMG_0077

And I decoupaged some leftover fabric to a wooden letter “A” that hubby had made a few years ago at my request.IMG_0079

Tuesday, December 21, 2010

Sweet Bitty Dresses

I tend to have a lot of smallish fabric scraps left—not so small they should just be tossed, but not enough to make a whole project.  I did realize, though, that making doll clothes takes a pretty minimal amount of fabric, and since the Peanut has been playing with her dolls a lot lately, I decided to try to make some more clothes for them.  I’ve made a couple of things in the past, but they were fairly involved.  I wanted something that could be done more quickly, so I turned to my favorite pattern ever: The Sweet Little Dress.  I’ve made several dresses (the owl dresses, the blue dress, this dress refashion, this pink baby dress, and this polka dot dress) for the girls.  It’s a great pattern that can be interpreted several ways, and is easy to embellish.

I took the dress pattern in the smallest size and shrunk it to 75%.  I also made it ever so slightly narrower by taking a slight bit out of the middle (fold).  It worked perfectly for Bitty Baby!

_DSC1647

The first one I made (above) I just made with some random fabric—I wanted it to be decent enough that it was wearable if it did turn out, but I didn’t want to waste my favorite fabric scraps if it didn’t work right.  (Also, sorry for the terrible photographs—it’s been dark for a couple of days and I finally gave in and took some with the flash).

I left the sleeves loose (without putting elastic in the ends)—it was going to be too labor-intensive, and would make it harder for a three-year-old to dress the baby.  I added a ruffle but didn’t shorten the dress enough, so it’s a bit long.  Also, it looked pretty plain, so I added a heart applique.  It actually looks pretty bad in person, but my daughter didn’t complain.  She also correctly recognized it as a heart, so I thought that was positive.

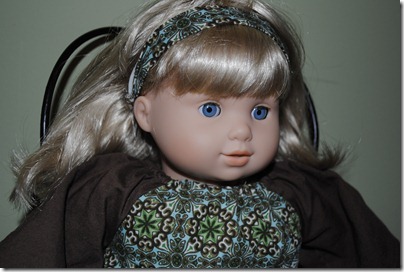
When I was sure it would work, I made another dress.  I used one of my favorite fabrics and added a solid-color sleeve.  (Actually, once I did that I wondered if the first dress would have looked better if I’d used the pattern for the body of the dress and the solid green for the sleeves, but I digress).  Also for the second dress, since the sleeves looked a little odd in the first one, I lengthened them.  I really like the way it turned out, and am pretty tempted to go purchase more of the fabric (it was leftover from a different project) so I can make a matching dress for the Peanut…but that goes against the reason I was making doll dresses in the first place.
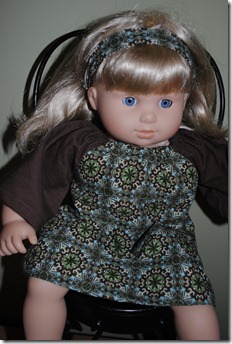
_DSC1658And I made a matching headband, too.  You can’t see the back half, but it’s made of FOE (foldover elastic) so it stays on her head._DSC1651.
Then I made another dress.  This is why my husband accuses me of doing things obsessively.  I had this fabric left from making a dress for the Little Miss (though she’s since outgrown the dress) and I got a coordinating fabric with tiny dots.  I also branched out and added a little ribbon trim near the bottom of the skirt.

_DSC1659.

The dress also fits the Little Miss’s doll, who is of similar size to Bitty (though with larger feet and better cuddling)._DSC1660.

And a real plus to making this dress for dolls—the elastic around the neck is so stretchy that it can go on feet-first.  It was really easy for my daughter to put on her dolls…

…and Bear.

_DSC1652.

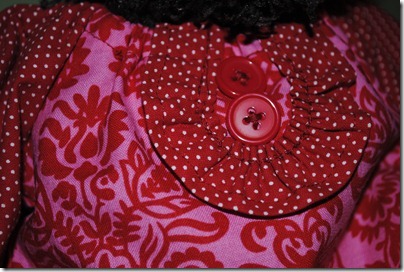
Poor Bear.  I think he’s a he-bear, but he loves his girl enough to take one for the team.  This dress, in case you haven’t seen the Little Miss’s nursery, is made out of the leftovers from her curtains.  The red dotted fabric might be my favorite fabric ever—it’s so versatile, and red makes me happy.  It’s also, coincidentally, the Peanut’s favorite color at the moment.  I made this dress for the Little Miss, since it matches her room, but the Peanut loved its redness and claimed it as her own.

I tried to make a fancy placket with buttons, and there’s also a fancy ruffle near the bottom.  Really, the possibilities are endless, but I needed to stop somewhere._DSC1653.
I though four dresses were plenty for a while.  I already had to get a bunny to stand in for the picture.  I’m actually pretty pleased with how many critters this pattern seems to fit (and right now as I type this, Elmo is wearing the red dress since we wouldn’t let Bear sleep in it…for his own sake).

And if your initials are CHG, you’ll want to stop reading at this point.  The rest of you (the other one reader?) may continue.
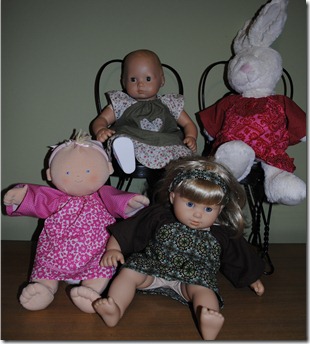
_DSC1645

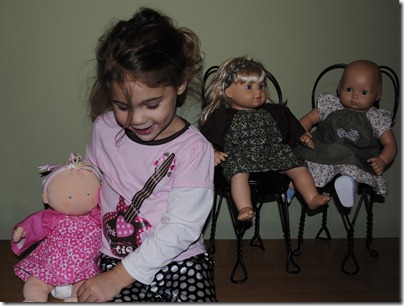
The Peanut with her dolls._DSC1664.

I found a cute fabric at JoAnns and made one for a friend of the Peanut who has an upcoming birthday and who, if I remember correctly, is getting a Bitty Baby for Christmas.  The main reason I’m including this in the blog (at the risk of ruining a surprise) is that I really like the ruffle at the bottom—I did the same style as on the red dress, but because of the contrasting colors it photographed a lot better.  So here it is.

_DSC1674.